

Examining textile fibers in cross-section can yield important information about the source of the fiber. I've always like working with a paraffin wax embedment on a hand microtome for cross-sectioning fibers, but the process is long, dissolving the wax away is smelly, and you tend to lose some of the cross-sections in the process. What do you do when you have only a single fiber and you can't afford to lose it, or when you're in a hurry? In this case, you need some way of securing the fiber so that the sections produced are easy to spot and handle. The technique described below is from a "Small Particle Handling" course which I attended at the McCrone Research Institute. The course attendees were able to try a range of single fiber cross-sectioning techniques and this is the one which I found was easiest and gave the best results. The technique works fine for natural protein and cellulose fibers, but, because it involves heating, it could be a problem for man-made thermoplastic fibers. (I've tried this on some man-made thermosets and it worked fine). Let me just say that I find this technique much easier than the "two sheets of 4 mil polythene" technique found in some forensics manuals. If, like me, you couldn't get a decent result with the "two sheets" technique, you may find this a lot more satisfactory.
What you’ll need
- Disposable polythene transfer pipette.
- Double-sided tape (e.g., 1/4” 3M 665 in a dispenser).
- Two glass microscope slides.
- Fresh single-edge razor blade (Teflon coated, if you’ve got it -- always use a fresh blade for sectioning work).
- Section of self-healing cutting mat cut to size of a microscope slide (or a plastic microscope slide) with a piece of double-sided tape stuck across the short dimension.
- A heat-proof “pokey thing" (we use the butt end of an Xacto knife handle, but a carbide scriber also works well).
- Stereo microscope.
- Serious microscope (TLM or PLM). Optional extras (makes everything easier)
- Two glass blocks (each made from 10 slides, see text below).
- Fine needle in needle-holder.
- Angled tweezers (e.g., Dumont 7) and tweezers large enough to handle a microscope slide.
- Kimwipes.
- A drop or two of amyl acetate. Method
- Clean your prep area and clean and assemble your tools. I strongly prefer a slightly textured black surface for embedded fiber work with tape and tools on the right, solvents and slides on the left, and glass blocks in the middle.
- Cut a section off a disposable polythene transfer pipette (about 1 cm, definitely shorter than your fiber). I slightly prefer the tip of the pipette, but other people go straight for the main body of the pipette – try it both ways and see what you prefer. Any part of the pipette works (except, perhaps, for the bulb).
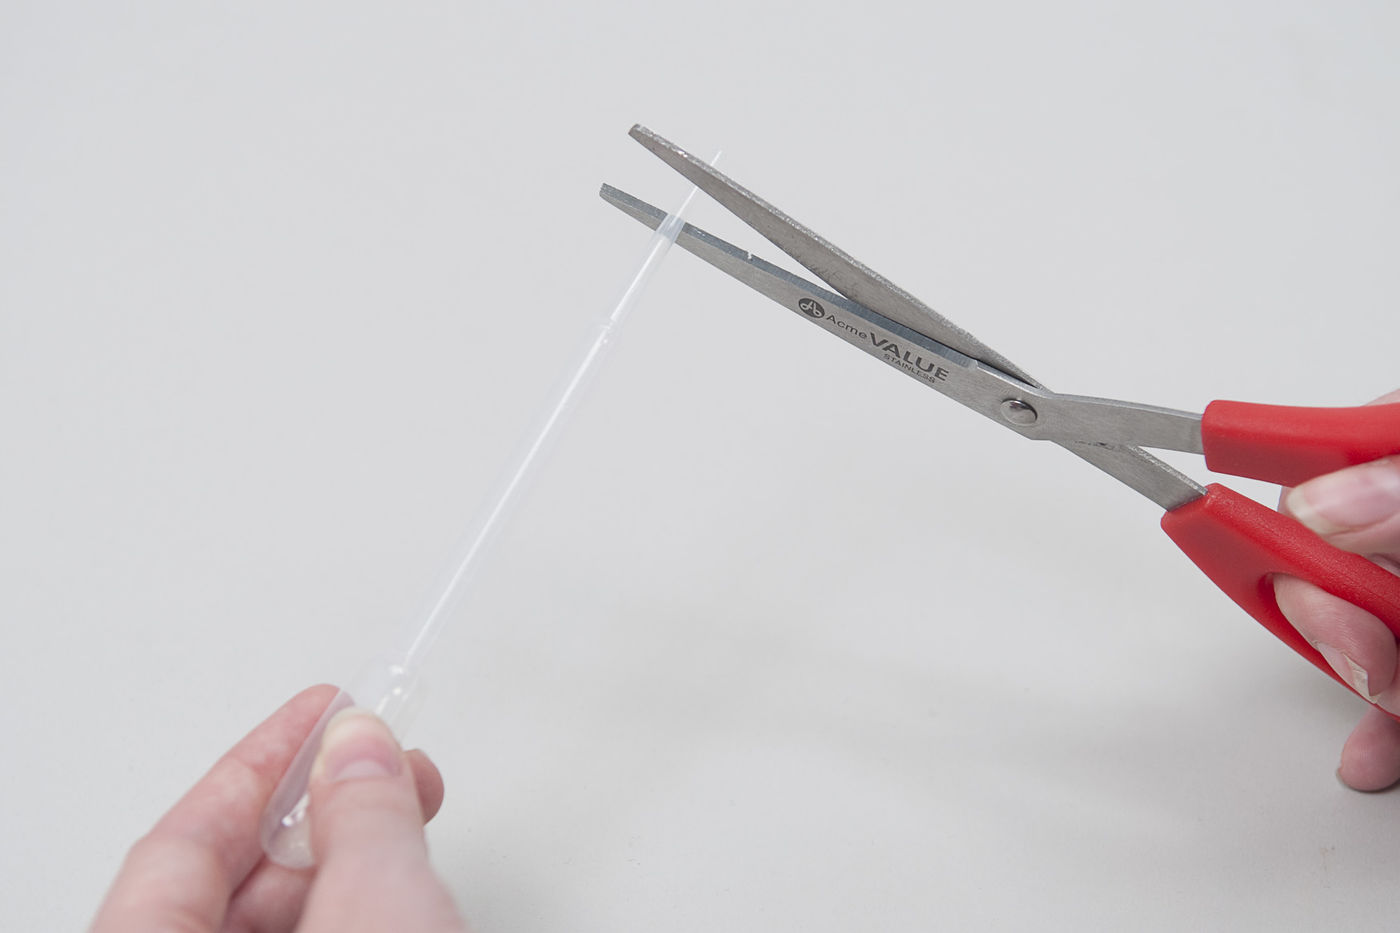 3. Put two strips of double-sided tape on a microscope slide\, spaced slightly further apart than the length of the pipette section that you just cut.
4. Thread the fiber through the section of pipette (this is easy because the hole through the pipette is quite large).
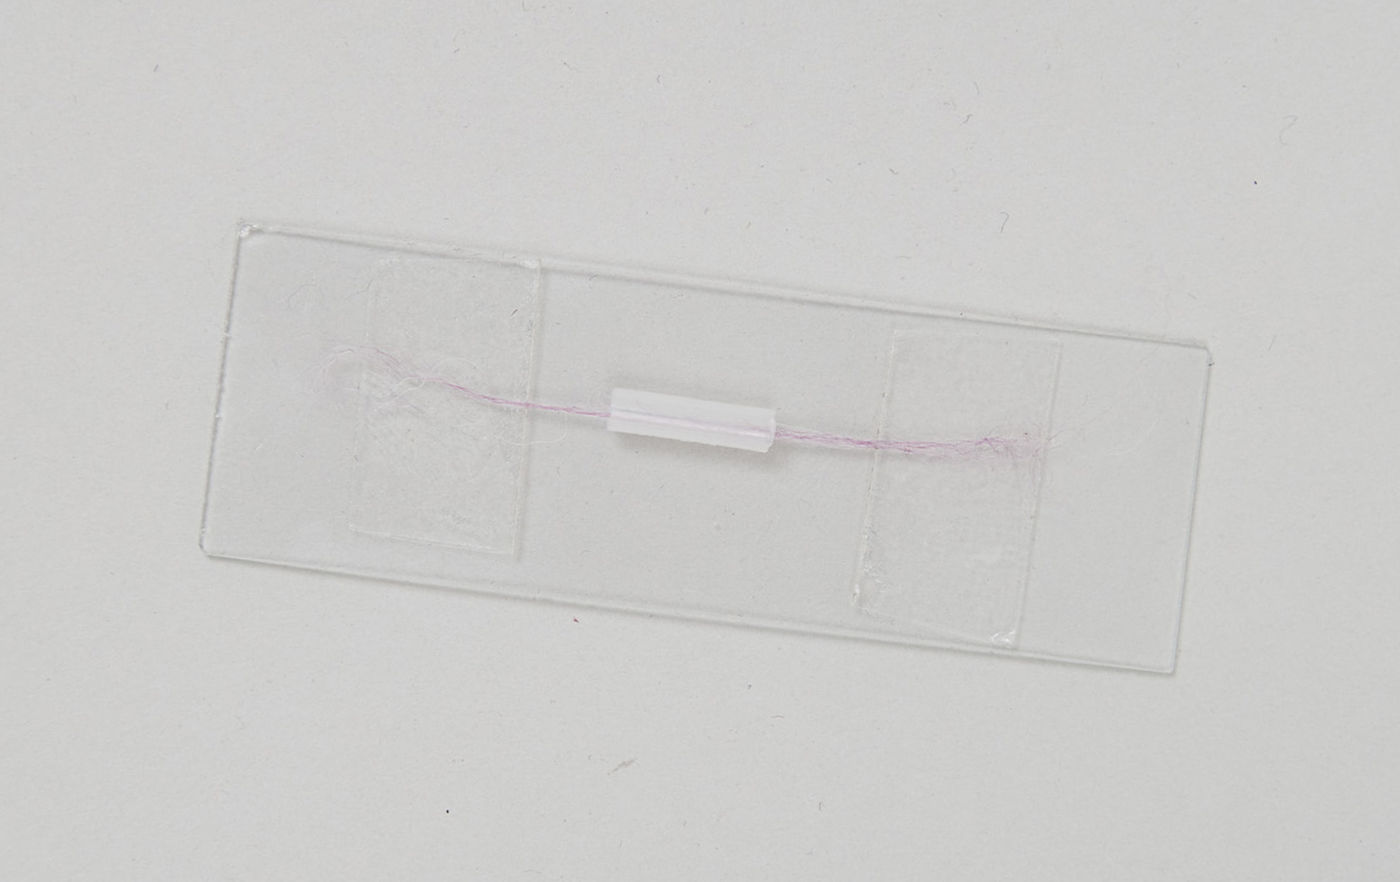
5. Stick one end of the fiber to one of the pieces of tape\, gently pull the fiber taut\, and then stick the other end to the other piece of tape. You now have the fiber stretched across the slide\, passing through the piece of pipette. I've used about twelve fibers from some knitting yarn here so that it shows up in the picture\, but you can easily do this with a single fiber.
3. Put two strips of double-sided tape on a microscope slide\, spaced slightly further apart than the length of the pipette section that you just cut.
4. Thread the fiber through the section of pipette (this is easy because the hole through the pipette is quite large).
5. Stick one end of the fiber to one of the pieces of tape\, gently pull the fiber taut\, and then stick the other end to the other piece of tape. You now have the fiber stretched across the slide\, passing through the piece of pipette. I've used about twelve fibers from some knitting yarn here so that it shows up in the picture\, but you can easily do this with a single fiber.
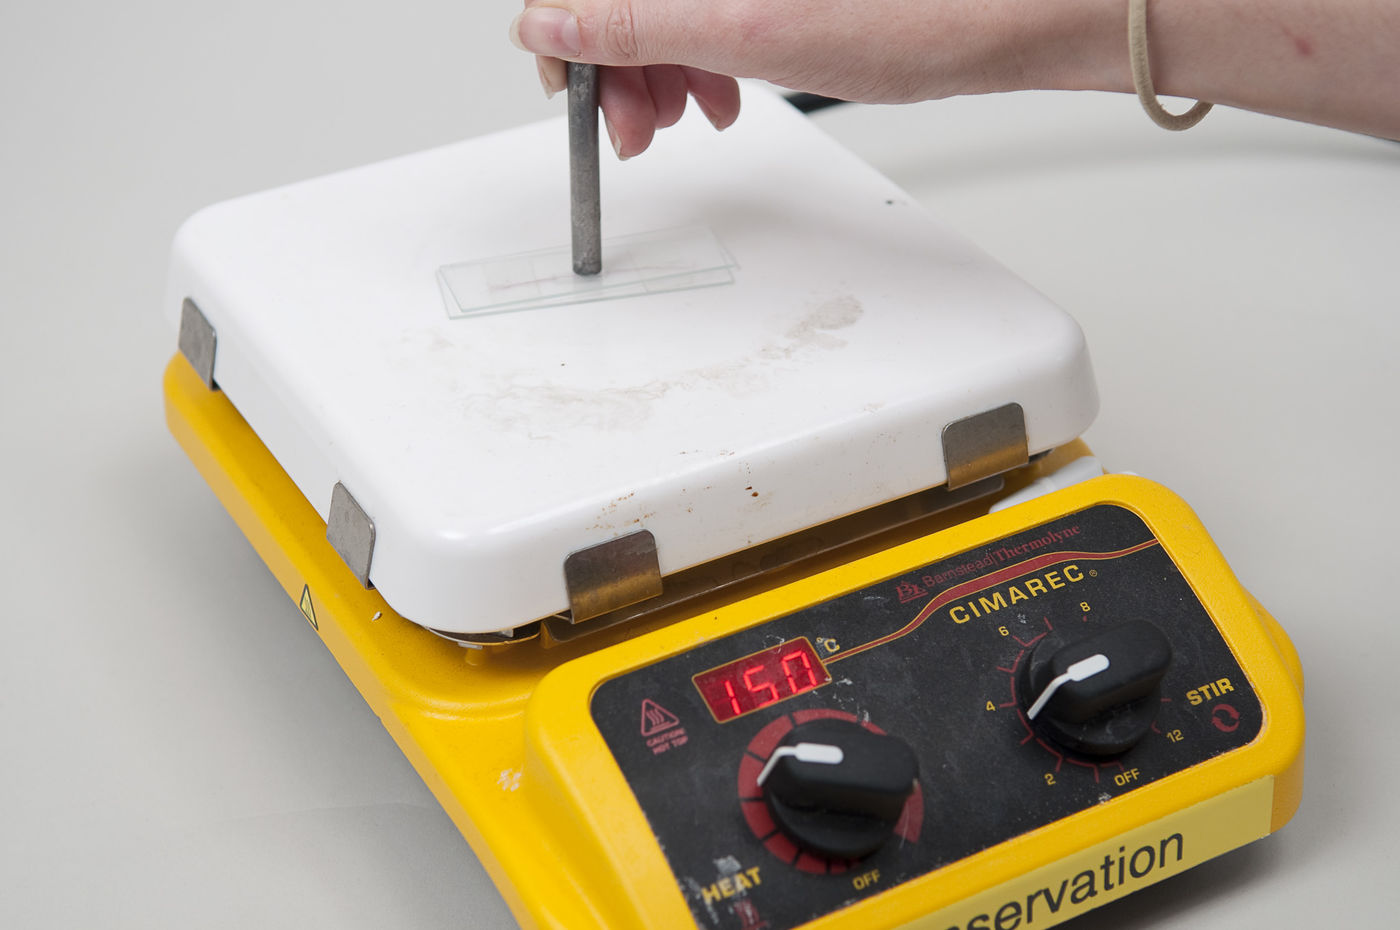
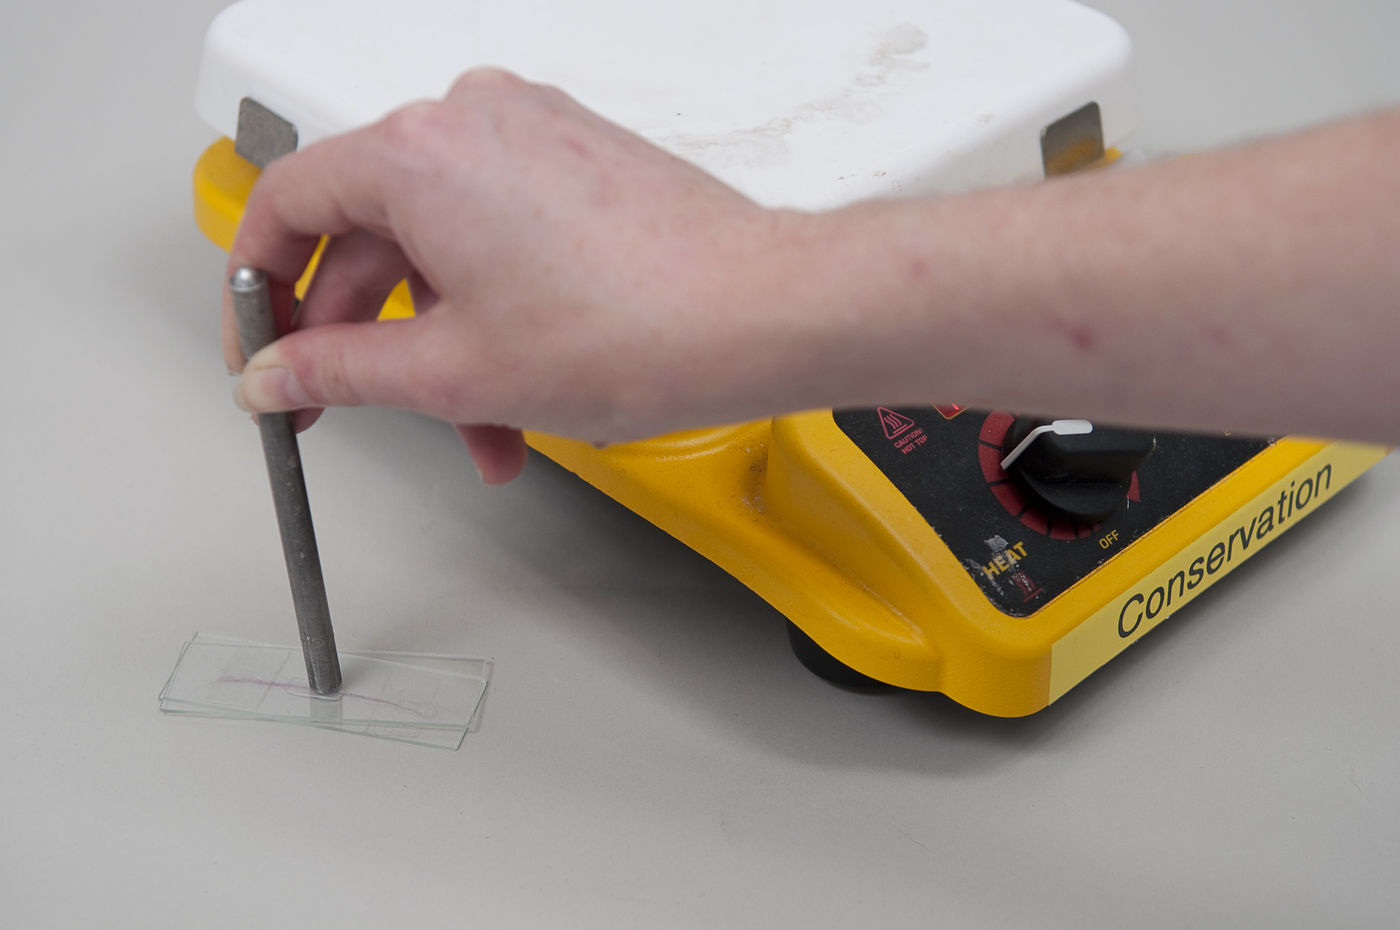
 6. Place the slide on a hot plate. The hot plate needs to be warm enough to heat the slide to the melting point of polythene. We found that the 150°C setting on our plate worked well (didn’t take too long for the polythene to start to melt)\, but your mileage may vary.
7. With large tweezers\, put another glass slide on top\, at a slight angle to the slide underneath (this makes it much easier to get the slides apart later). The glass slide won’t sit flat\, but that’s fine.
8. Press down firmly in middle of the top slide with your heat-proof "pokey thing" (the slide will get hot\, so don’t use your finger!). This is a bit fiddly at first because the pipette section is round and the top slide may try to roll away - it's definitely easier if you are using a wider section from the pipette (as opposed to the tip) because it will press flat more gracefully.
6. Place the slide on a hot plate. The hot plate needs to be warm enough to heat the slide to the melting point of polythene. We found that the 150°C setting on our plate worked well (didn’t take too long for the polythene to start to melt)\, but your mileage may vary.
7. With large tweezers\, put another glass slide on top\, at a slight angle to the slide underneath (this makes it much easier to get the slides apart later). The glass slide won’t sit flat\, but that’s fine.
8. Press down firmly in middle of the top slide with your heat-proof "pokey thing" (the slide will get hot\, so don’t use your finger!). This is a bit fiddly at first because the pipette section is round and the top slide may try to roll away - it's definitely easier if you are using a wider section from the pipette (as opposed to the tip) because it will press flat more gracefully.
 9. The bottom slide heats up and the polythene turns from its normal\, slightly translucent\, appearance to transparent. At this point the polythene has melted\, the fiber is embedded in the polythene\, and the slides are stuck together by melted polythene. (You should have been pressing down on the top slide all this time\, but you don't need to press so hard once the polythene has melted.)
10. Remove the slide sandwich from the hot plate. (Again\, it's hot\, so use tweezers rather than your fingers!)
9. The bottom slide heats up and the polythene turns from its normal\, slightly translucent\, appearance to transparent. At this point the polythene has melted\, the fiber is embedded in the polythene\, and the slides are stuck together by melted polythene. (You should have been pressing down on the top slide all this time\, but you don't need to press so hard once the polythene has melted.)
10. Remove the slide sandwich from the hot plate. (Again\, it's hot\, so use tweezers rather than your fingers!)
 11. Continue to press gently down on the top slide with the "pokey thing" until the polythene goes back to being translucent. The translucency means that the polythene has solidified and you can stop pressing.
 12. Wait for the sample to cool...
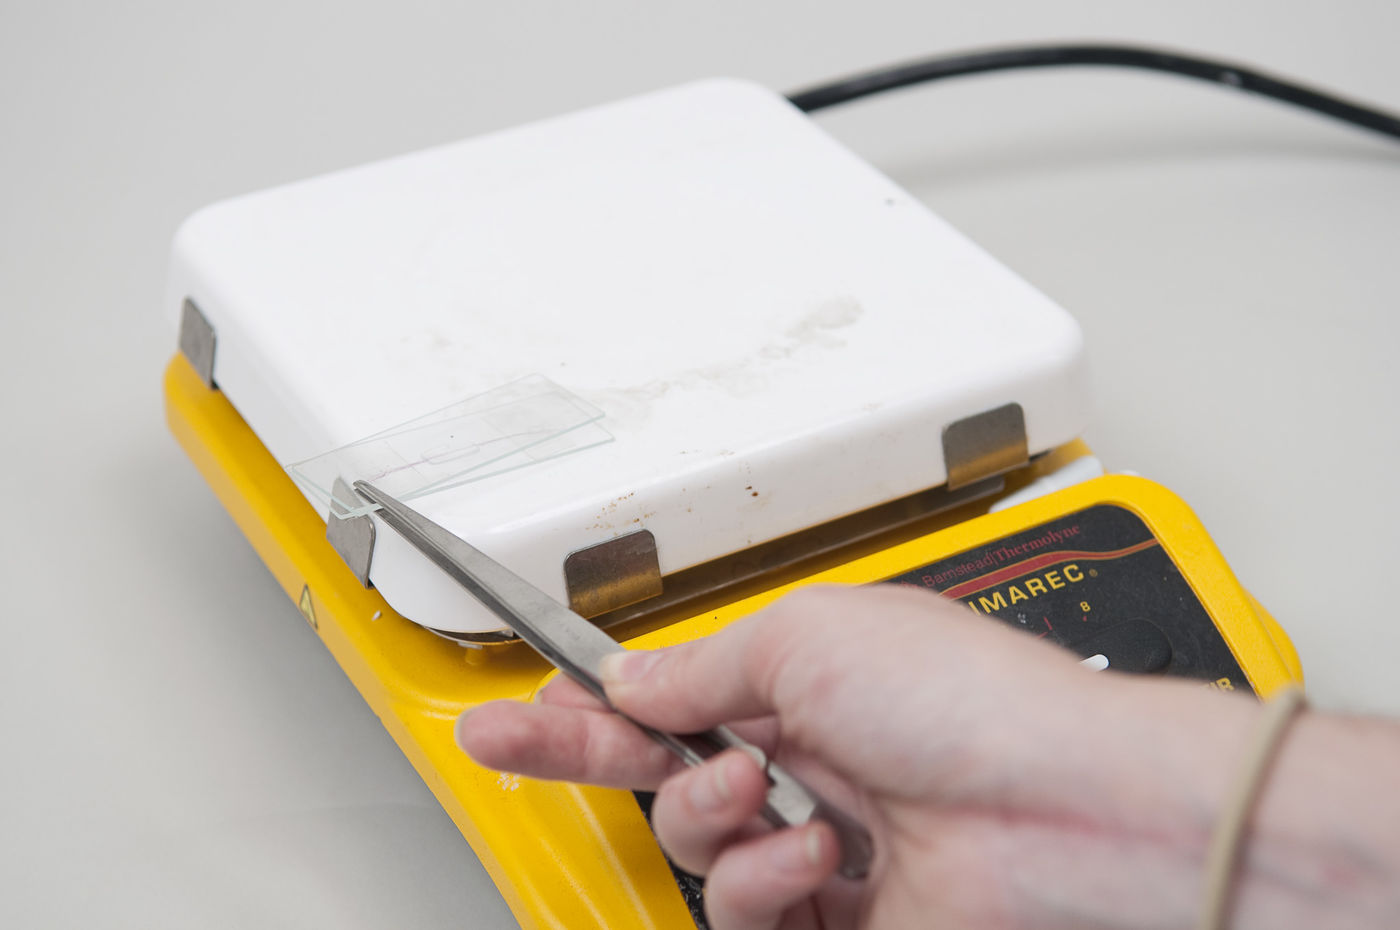
13. Pull the top slide off the sandwich to expose the polythene with the embedded fiber. The removal is easy if the top slide is offset at an angle relative to the bottom slide – it's more difficult if they're perfectly aligned.
14. Peel the polythene with the embedded fiber off the bottom slide and transfer it so that it is stuck half-on-half-off the piece of double-sided tape on the piece of cutting mat .
12. Wait for the sample to cool...
13. Pull the top slide off the sandwich to expose the polythene with the embedded fiber. The removal is easy if the top slide is offset at an angle relative to the bottom slide – it's more difficult if they're perfectly aligned.
14. Peel the polythene with the embedded fiber off the bottom slide and transfer it so that it is stuck half-on-half-off the piece of double-sided tape on the piece of cutting mat .
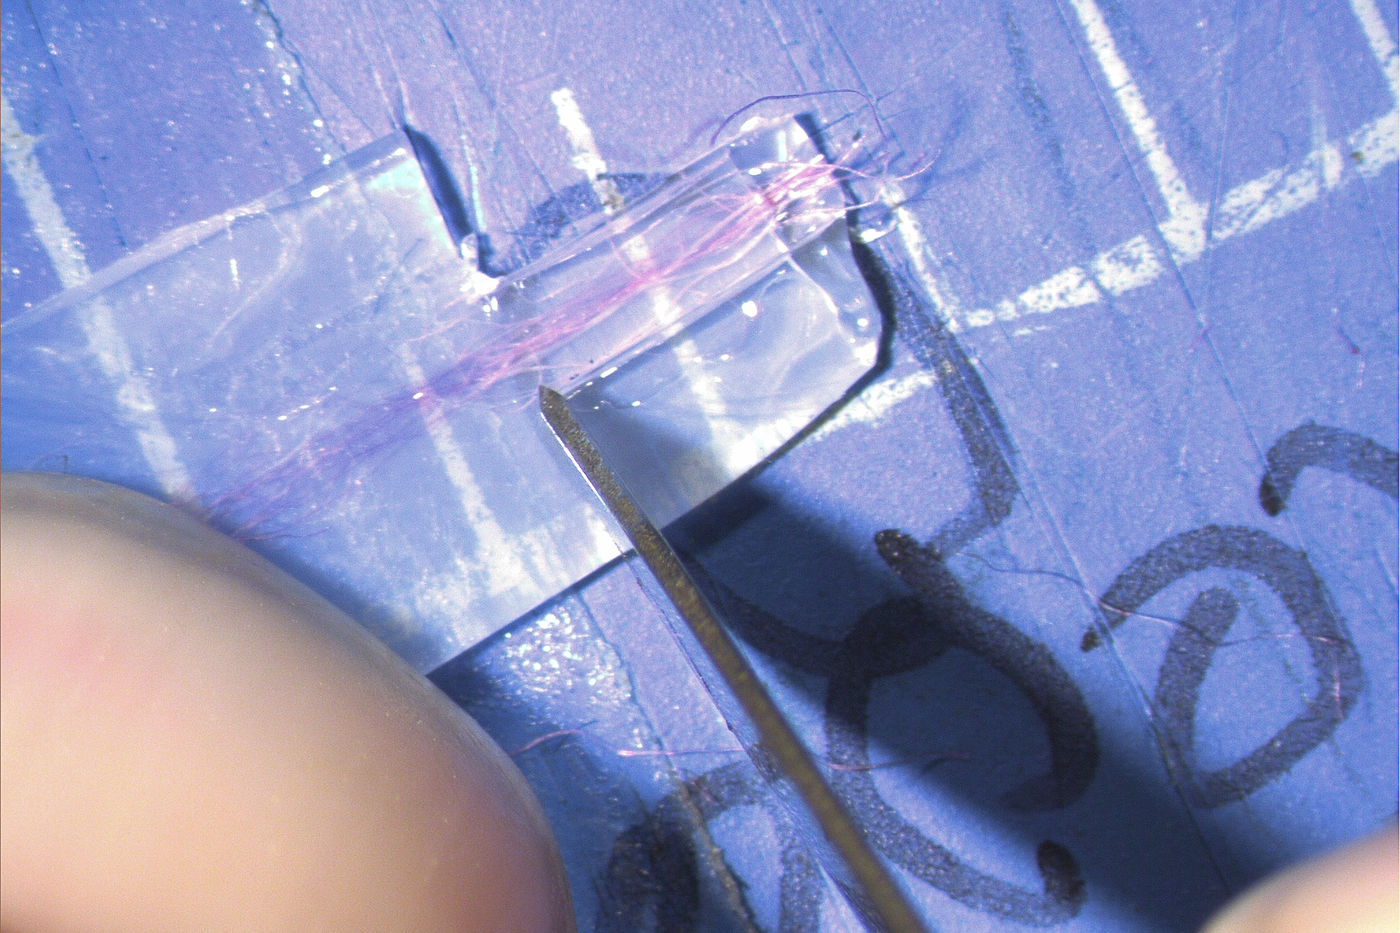
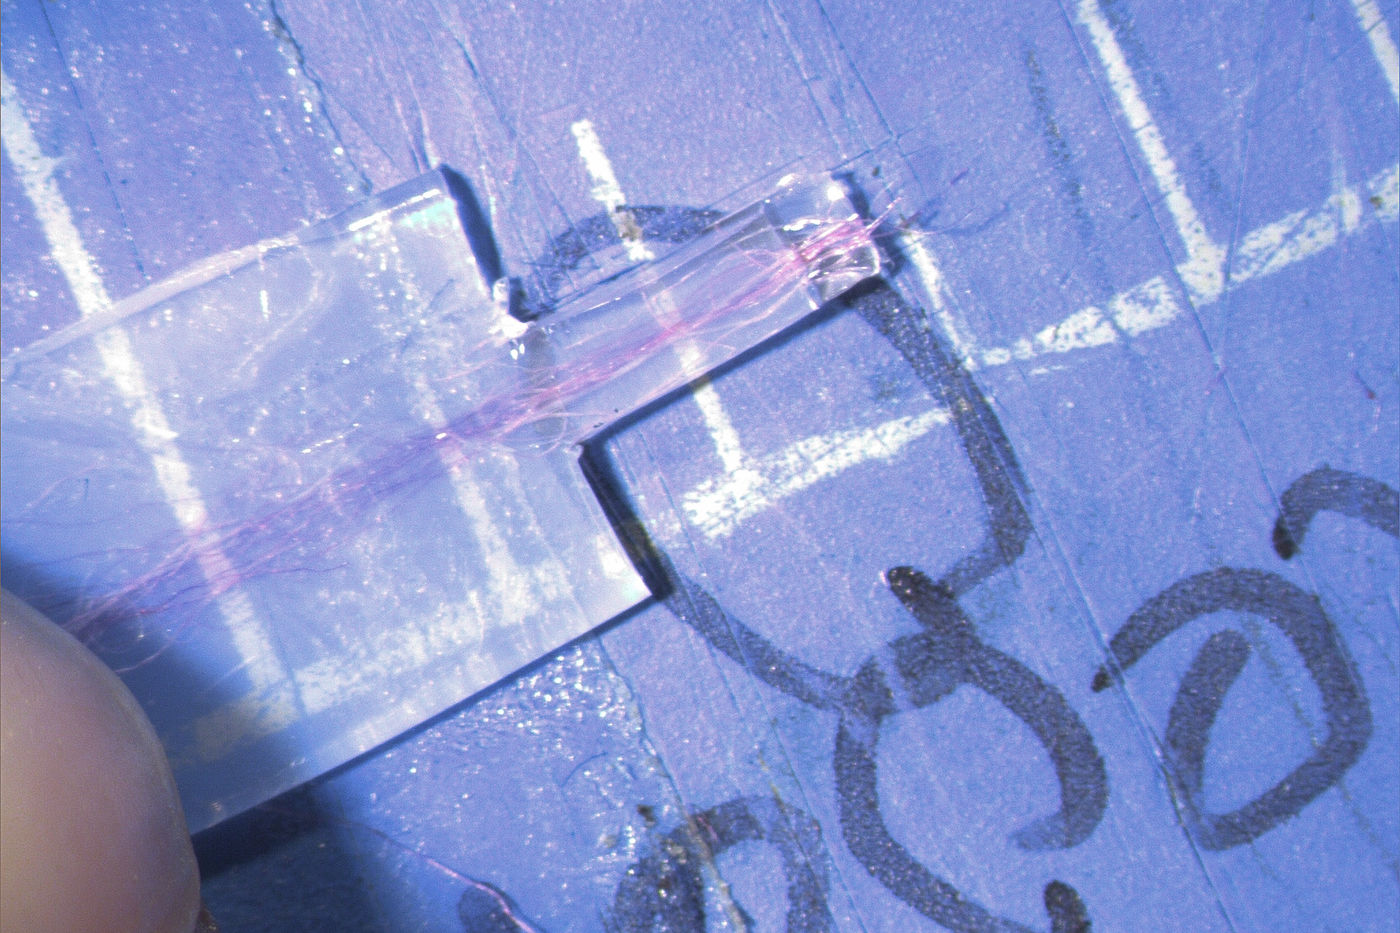
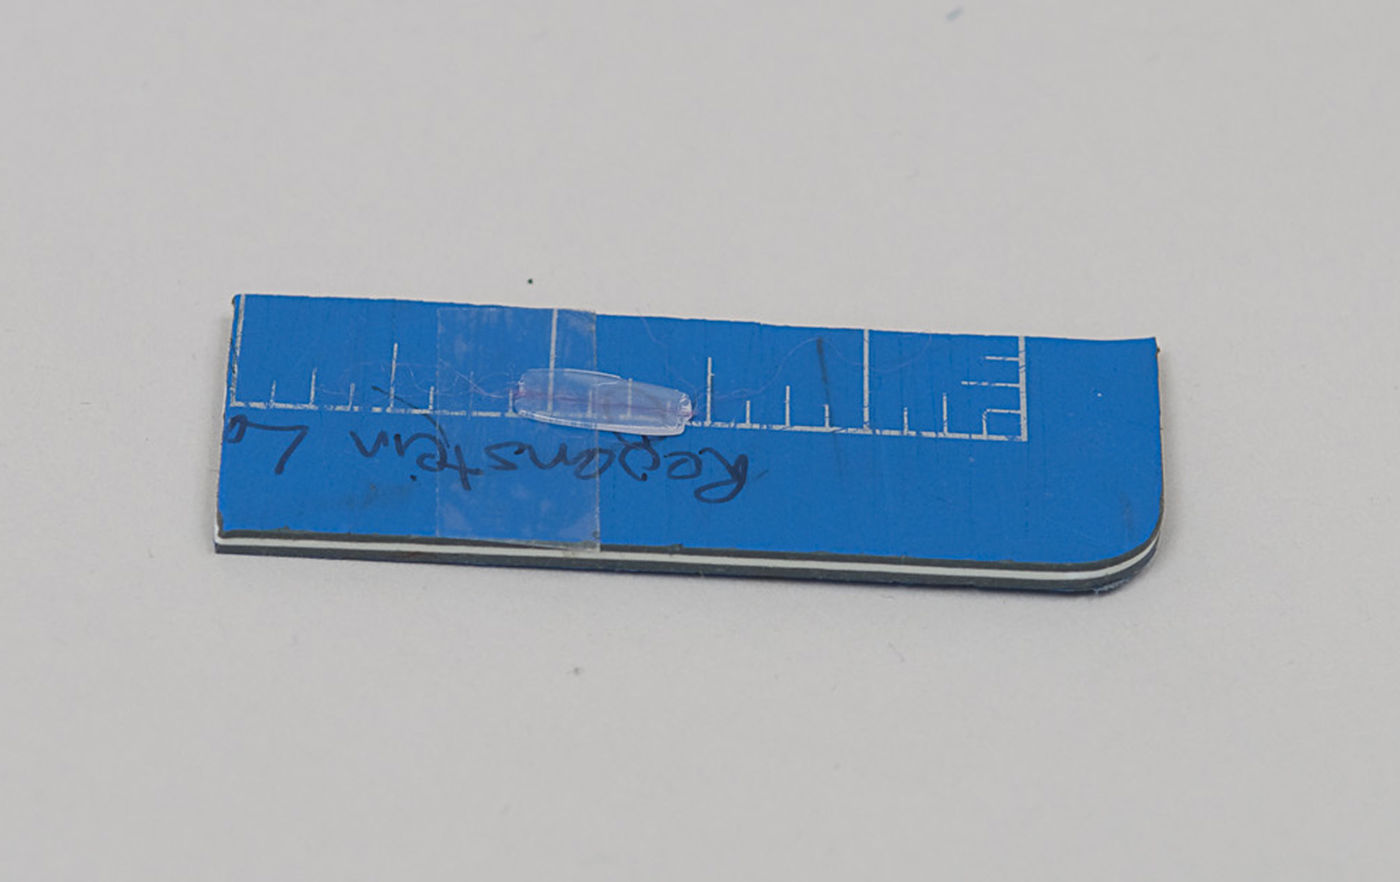 15. Under a stereo microscope\, hold the polythene down with your non-dominant forefinger. Then\, using your dominant hand\, cut away the excess polythene around the embedded fiber so that only a thin neck of polythene remains surrounding the embedded fiber. A PTFE-coated single-edge razor blade is ideal\, but a No. 15 scalpel will also work fine for this part.
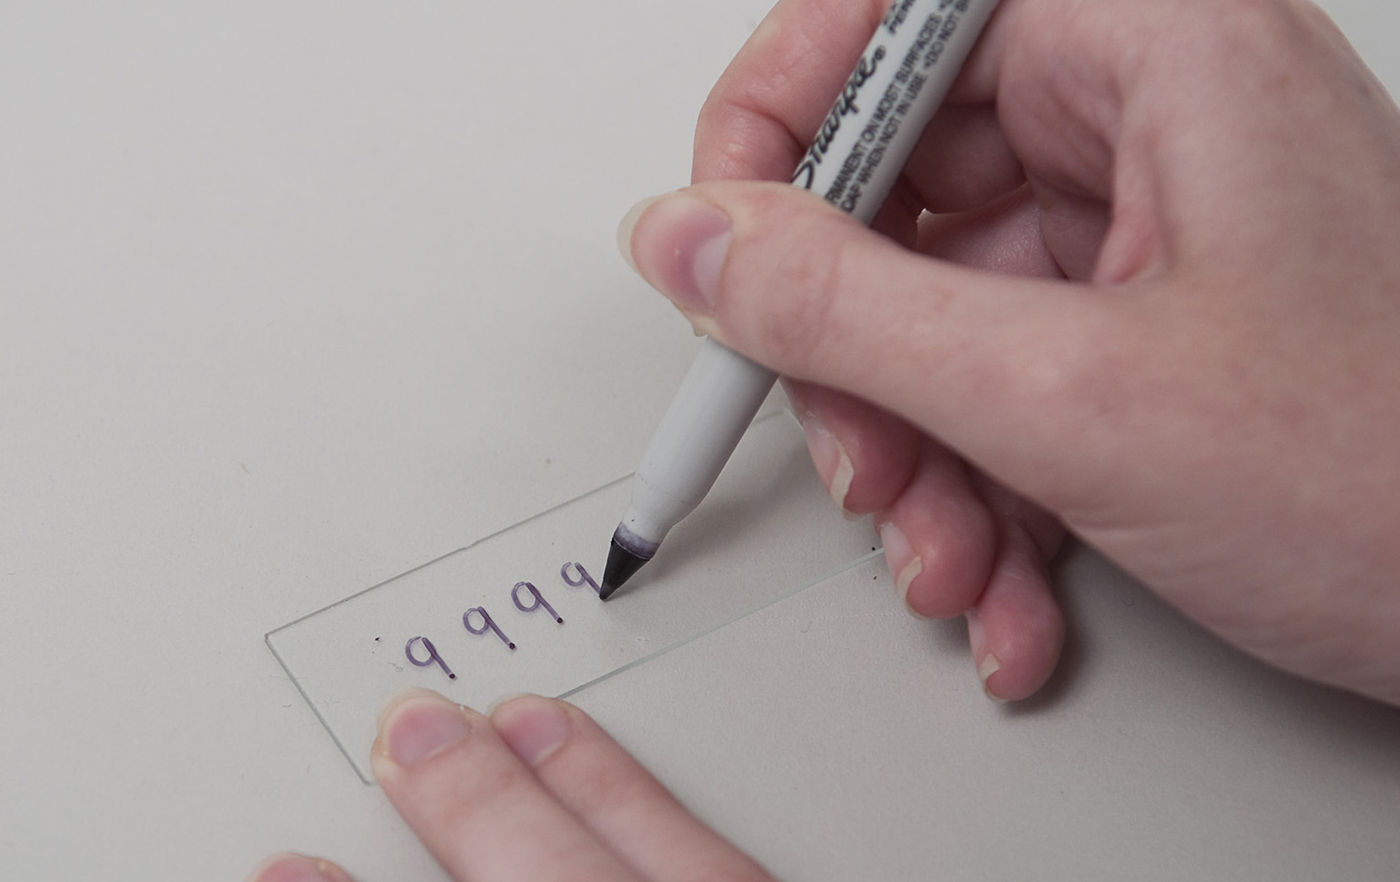
 16. Put the mat section with the attached polythene-and-fiber aside and make a "parking" slide to receive the sections that you're going to cut. Use a fine Sharpie to write a series of 9’s on a glass slide. When you turn it over\, presto!\, you have a series of P’s (for ‘Parking’). Cross-sectioned fiber samples will be placed on the parking slide inside the loop of the P’s (one sample in each P).
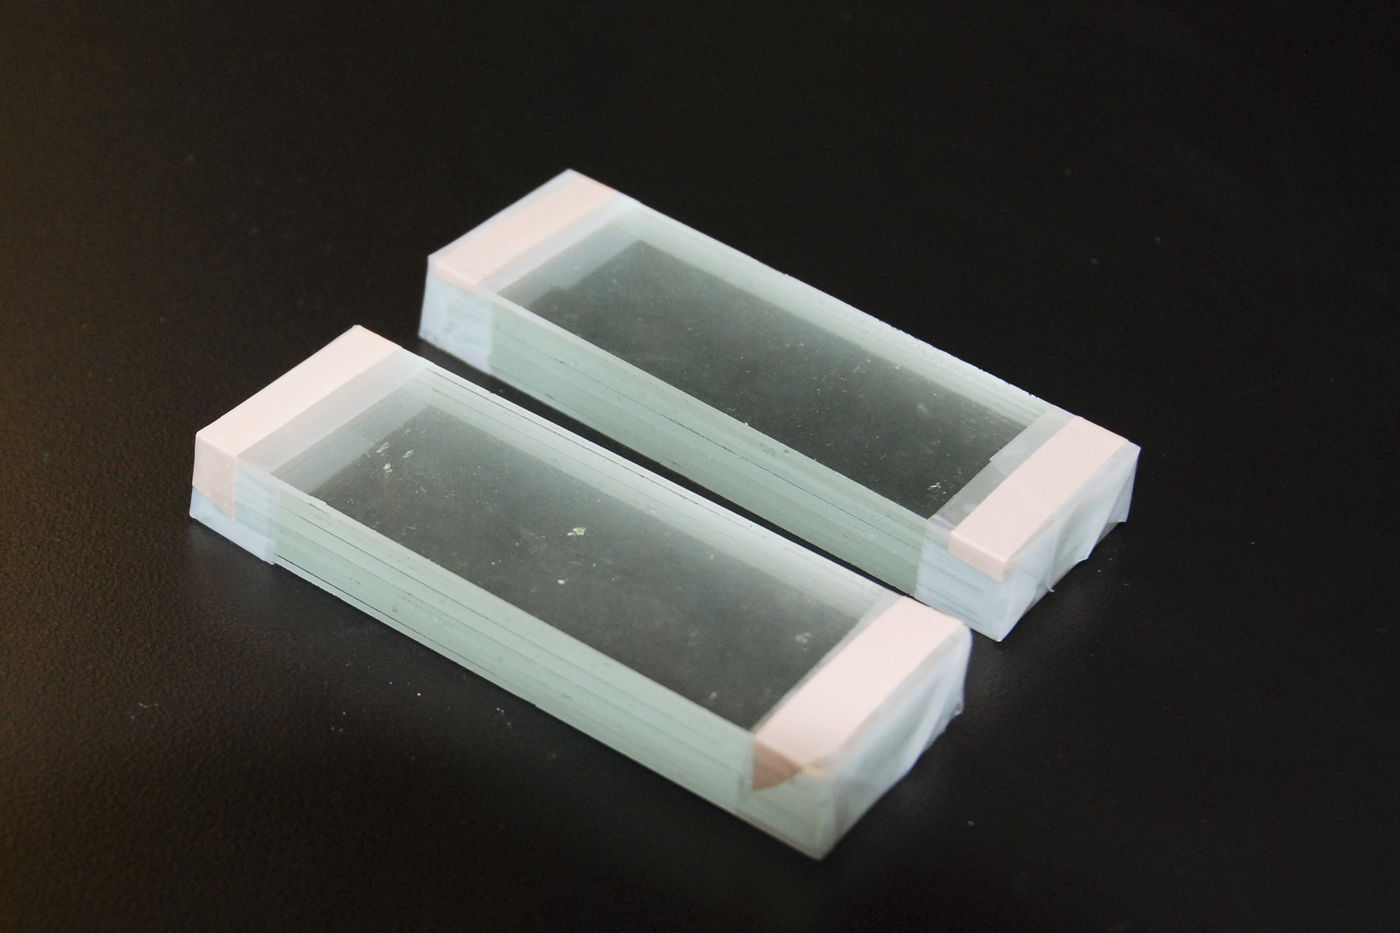
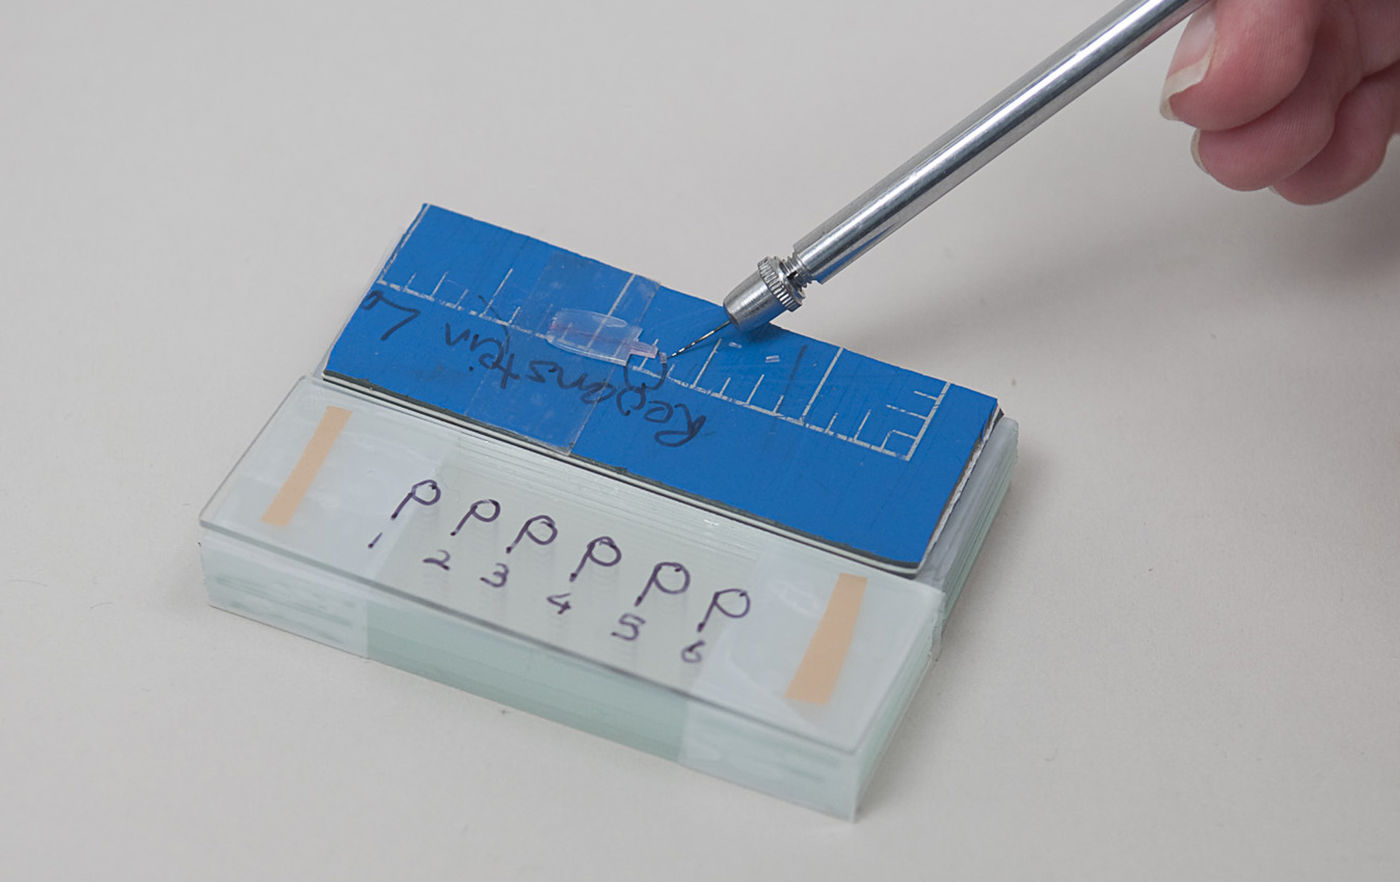
There are several nice properties of this kind of parking slide: writing the labels on the underside of the slide leaves the top smooth and easy to clean; having a sample positioned in the loop of the P makes it easy to find later on when you're working under the serious microscope; the P's provide a clear indication of the expected orientation of the slide. The property I value most, though, is that the P markings make your sample collection slide easy to spot when you have several different slides out in your work area. (If you’re really good, when you're marking the slide you can write backward numbers below the 9’s so that, when the slide is turned over, your parking positions are numbered.) Clean the top surface with a fresh Kimwipe and a drop or two of amyl acetate. 17. If you don’t already have some\, make two glass blocks to support your work. The blocks move the work level higher which is very helpful when using a fine needle to pick small samples from the cutting mat and transfer them to the parking slide. In this situation you want the needle at about 15° to the slide and it’s very difficult to hold the needle comfortably at this low angle if the work level isn't high enough. Blocks are made by wrapping 3M 510 Magic tape around the ends of a stack of 10 glass slides (folding the ends of the tape neatly against the sides makes the block more sturdy). Add thin strips of Band-Aid tape (cut them straight from a plastic Band-Aid) to the top edges of the blocks to help reduce the slipperiness of the top surface.
Place your cutting mat on one block and the transfer slide (showing P’s) on the other. 18. Move the glass block with the prepared area of the polythene with embedded fiber under the microscope. Hold the prepared area down with your non-dominant forefinger and use a fresh single-edged razor blade in your dominant hand to cut thin slices from the prepared area (I find that double-edged razor blades are too bendy and scalpels don't cut finely enough). Try to keep the razor blade perpendicular to the work surface as you cut. If you cut at an angle\, then the cross-section will be distorted (e.g.\, a circular cross-section will look oval). You should aim to produce about 10 slices – some will be better (thinner) than others. The slices may stick the razor blade – don’t worry about this right now because you can pick them off later. You can do the cutting on a glass slide\, but the razor blade will become dull really quickly – it’s much better to use a cutting mat or\, if you need to use transmitted light while sectioning\, a plastic microscope slide (e.g.\, Permanox brand).
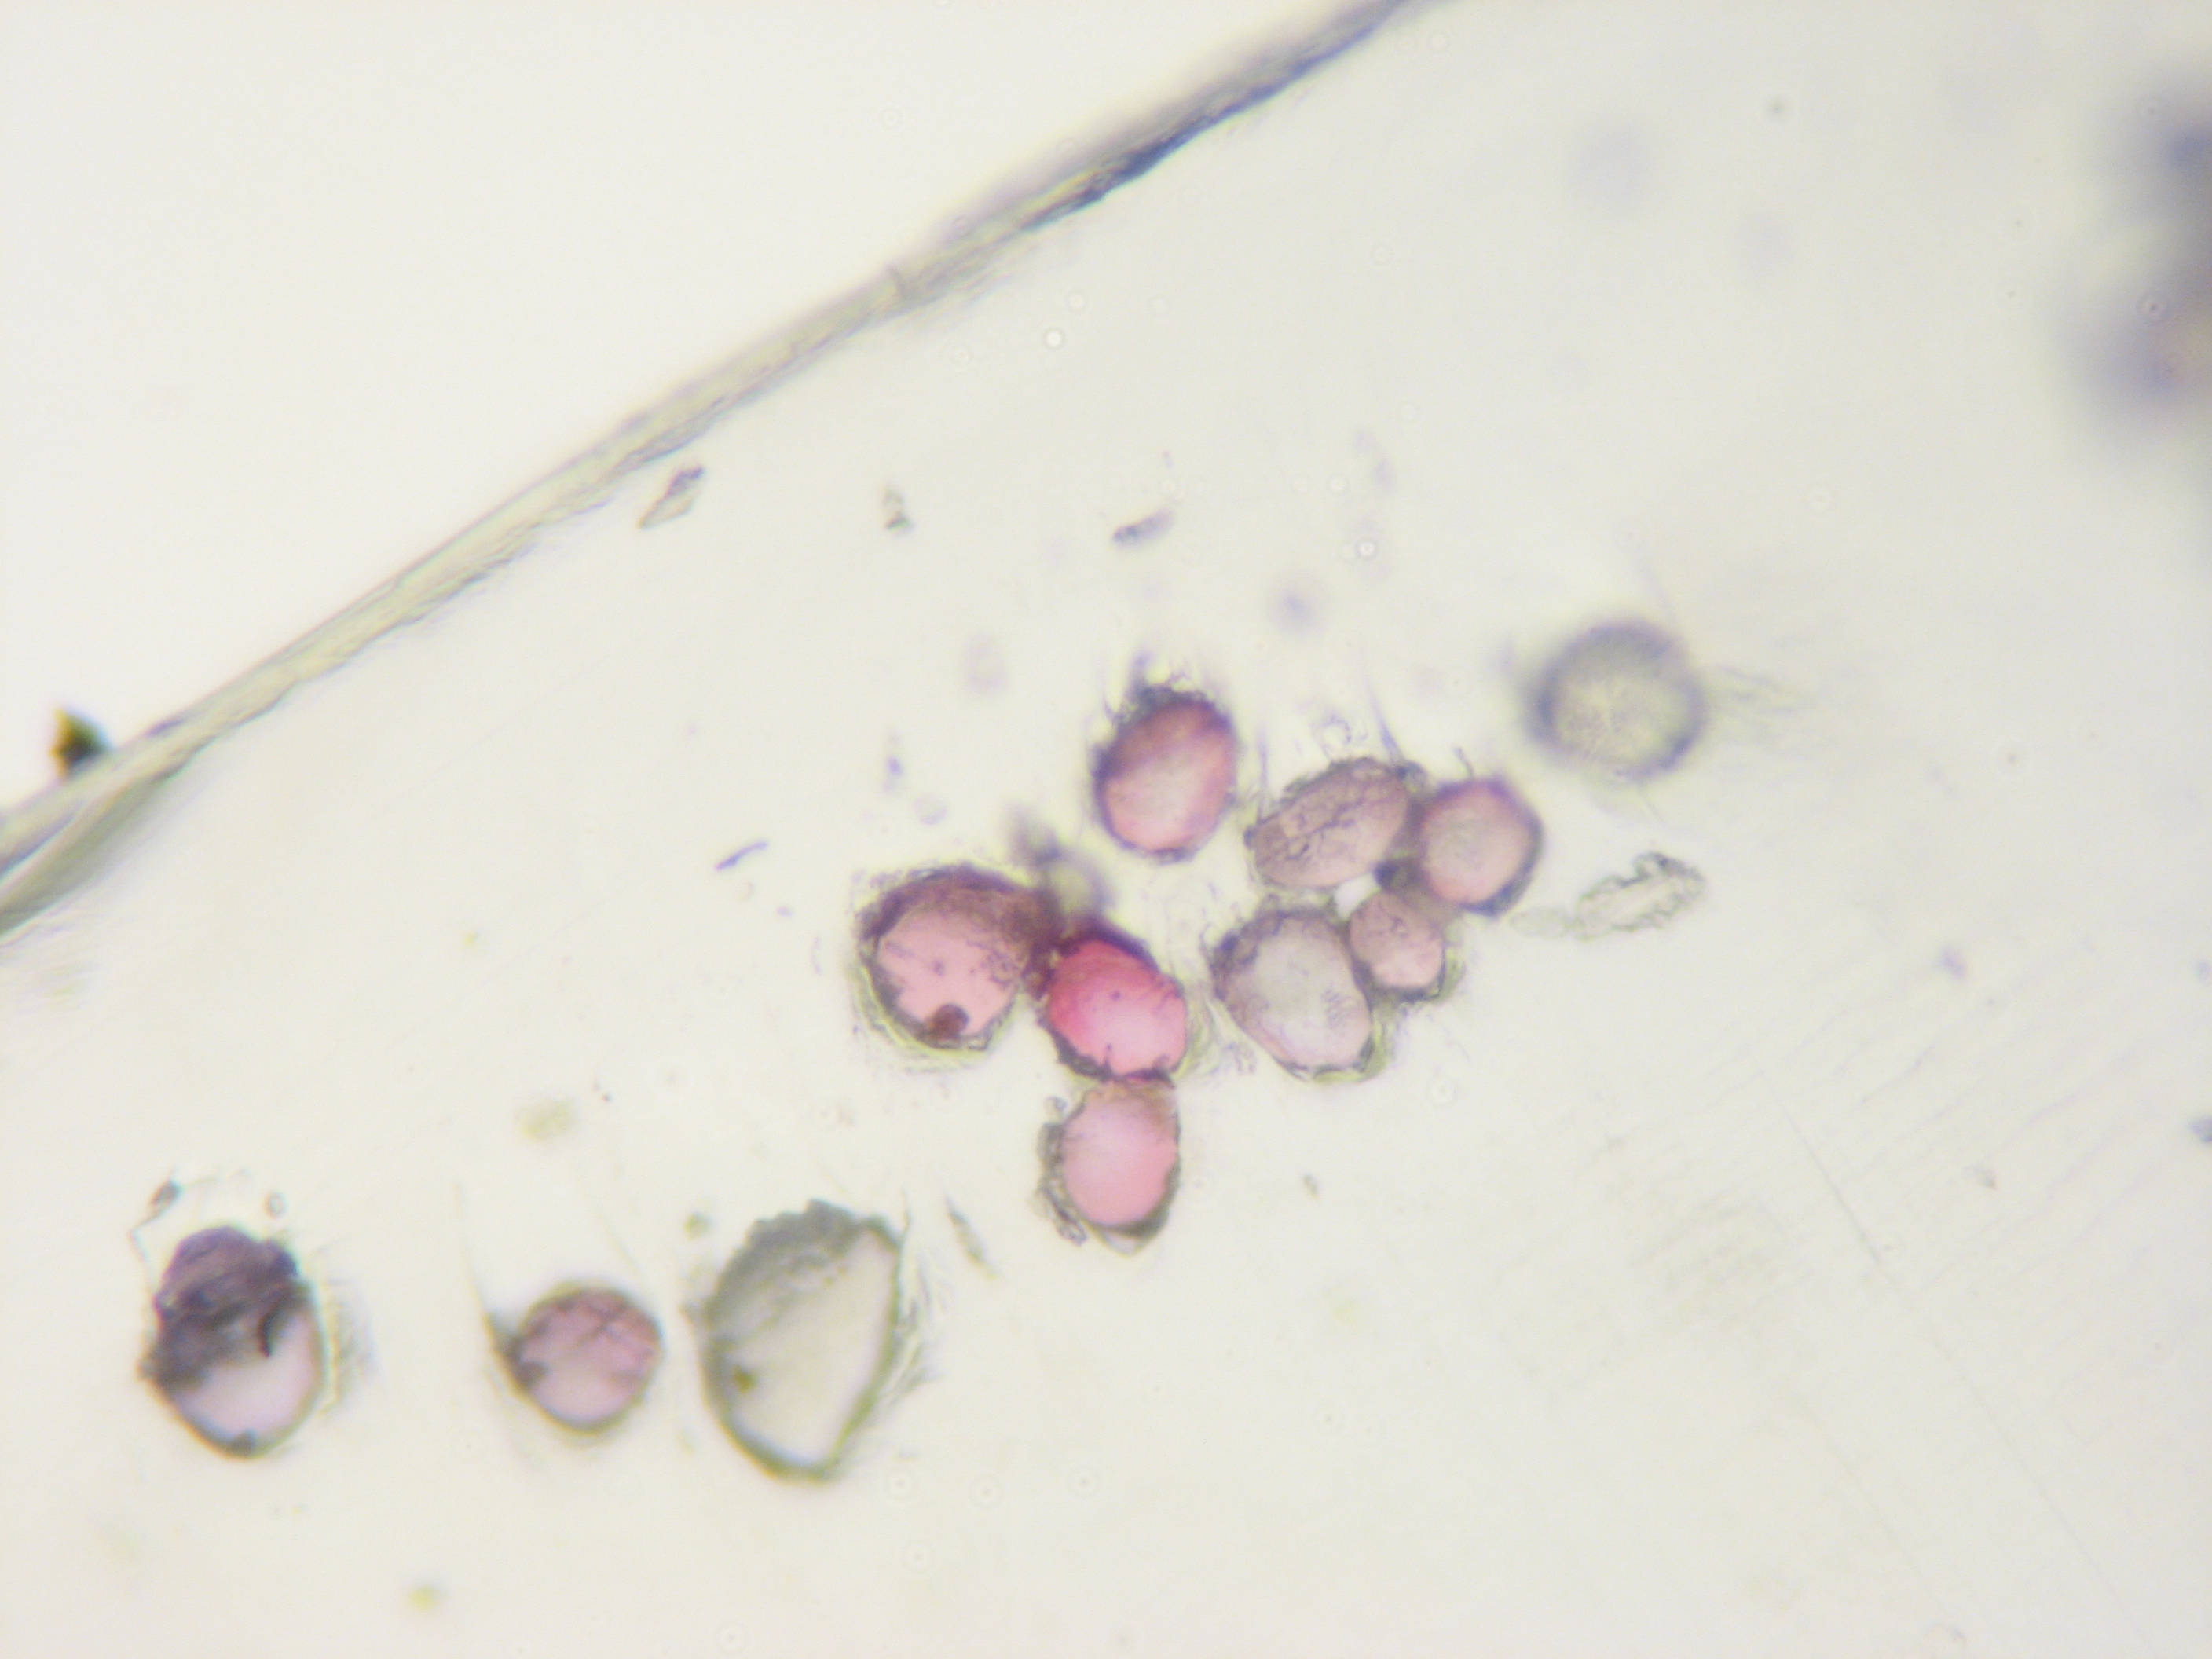
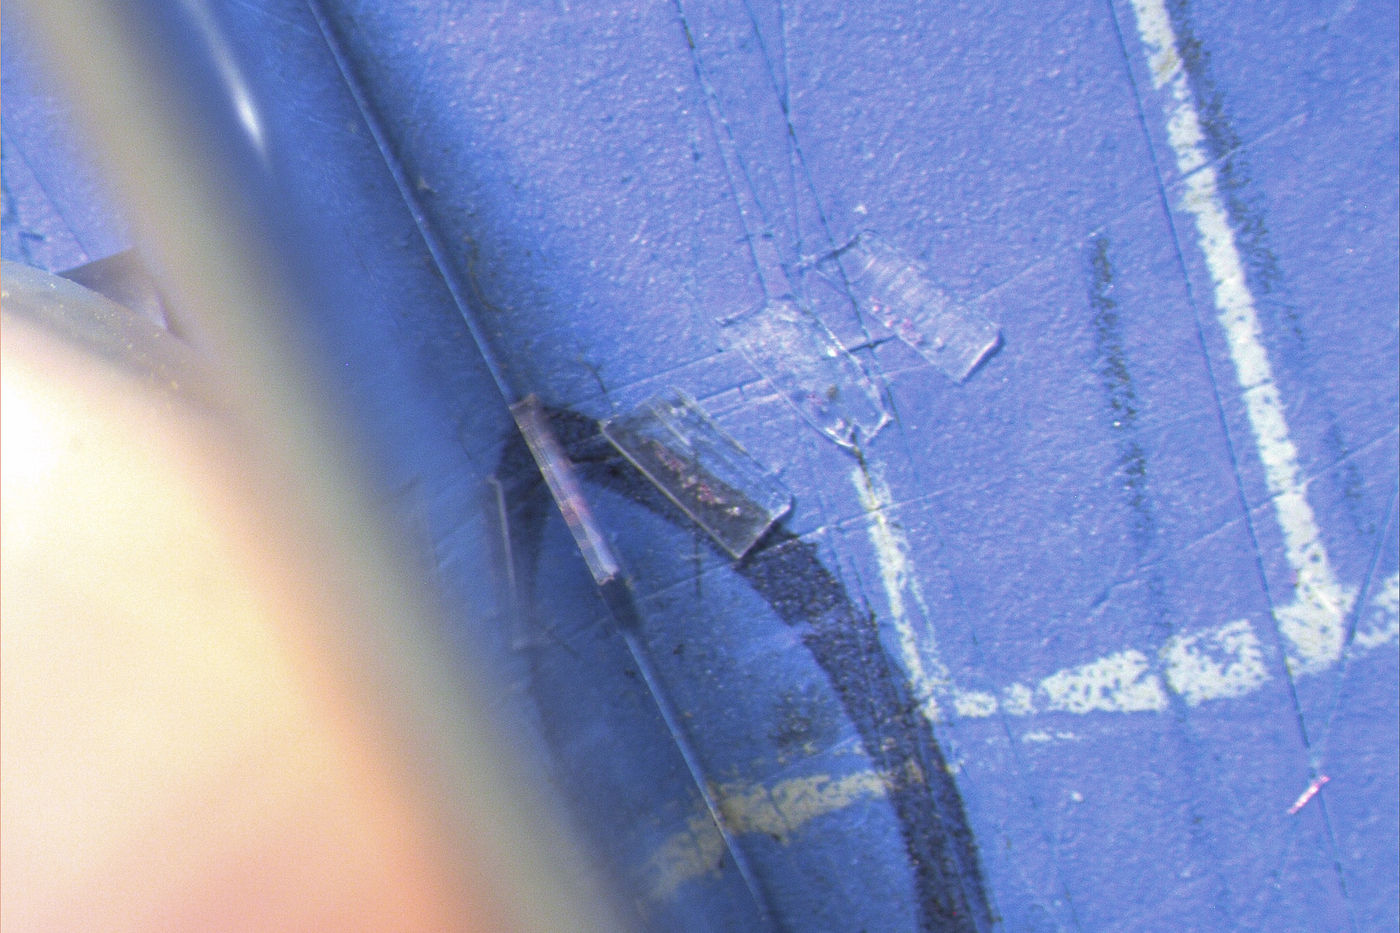 19. Examine the slices on the cutting mat under the stereo microscope (lay the razor blade flat on the mat if there are pieces stuck to it). The good slices are the thin ones with minimal curl. Pick a good slice up with your fine needle and hold the piece in the air where you can see it through the microscope (it will be slightly out of focus). With your free hand\, move the block with the cutting mat out of the way and move the block with the parking slide into position under the scope. Put the slice down inside the loop of one of the P’s. The glass blocks are the same height so you shouldn't need to refocus. Repeat this process\, using a different P each time\, until you have moved three or four good slices onto the transfer slide. As you put the slices down on the parking slide try to
* roll the needle lightly (about a quarter turn) just above the surface, rather than pushing the needle tip down onto the slide, and to
* keep the needle at a shallow (15°) angle relative to the surface. Combining these two actions helps to stop the sample jumping into the air like a tiddlywink pressed between the needle and the slide.
19. Examine the slices on the cutting mat under the stereo microscope (lay the razor blade flat on the mat if there are pieces stuck to it). The good slices are the thin ones with minimal curl. Pick a good slice up with your fine needle and hold the piece in the air where you can see it through the microscope (it will be slightly out of focus). With your free hand\, move the block with the cutting mat out of the way and move the block with the parking slide into position under the scope. Put the slice down inside the loop of one of the P’s. The glass blocks are the same height so you shouldn't need to refocus. Repeat this process\, using a different P each time\, until you have moved three or four good slices onto the transfer slide. As you put the slices down on the parking slide try to
* roll the needle lightly (about a quarter turn) just above the surface, rather than pushing the needle tip down onto the slide, and to
* keep the needle at a shallow (15°) angle relative to the surface. Combining these two actions helps to stop the sample jumping into the air like a tiddlywink pressed between the needle and the slide.
[The reason for moving the glass blocks around while watching the sample under the scope is so that you always keep your eyes on the sample – if it drops off the needle you know where to start looking for it.]
 20. Remove the remaining portion of your polythene-fiber block from the cutting mat and put it in a labeled sample tube (cut away any extra polythene if necessary).
21. Examine your sections under the serious microscope.
20. Remove the remaining portion of your polythene-fiber block from the cutting mat and put it in a labeled sample tube (cut away any extra polythene if necessary).
21. Examine your sections under the serious microscope.
 Acknowledgments
- Sebastian Sparenga (McCrone Research Institute) for teaching the method. Also to the other students on the course for their comments and feedback on cross-sectioning.
- Cate Schur (2011 Regenstein Intern) for her invaluable assistance with taking the images for this blog entry.
- Lauren Horelick (National Museum of the American Indian) for her evaluation of different methods of cross-sectioning fibers in Ellen Carrlee's Alaska Fur ID blog which prompted putting this post online. (Lauren's comparisons are in the Tips section, towards the bottom of the page.)


